On Caller

“On Caller” is an application to help physicians keep track of their on call messages. It is not meant to suggest or dictate any medical care. That is the sole responsibility of the physician.
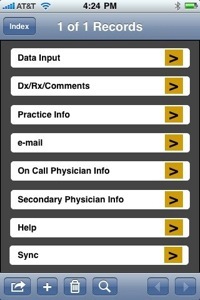
To add a new record, depress the + button on the bottom of any layout. The “iphone” scroll bar is one method of choosing the preferred layout. Alternatively, by pressing the gold arrows on the “Index page” or in any of the field boxes allows the user to go directly to a specific menu in order input data.
The first layout that the physician should fill in is the “On call physician info”. The application defaults to physician # 1. This is YOUR NUMBER. Fill in YOUR name and e-mail address. The application will use this info to send e-mails of on call messages to you. If you share this phone with another physician, they should be physicians 2,3 etc. If you are the only physician to use this phone, no further information is needed other than Physician # 1.
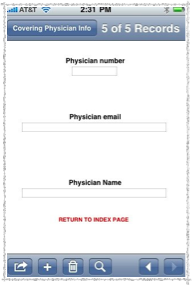
Next go to the “Covering physician info” layout. The default setting is Physician # 0. This physician has no data. The “Covering info layout” sends e-mails automatically to the physician that you are covering. I would suggest that any number other than “0” be used.
If physician # 5 is selected for example, type in his or her name and e-mail address. You can type this information in for as many physicians that you cover for.
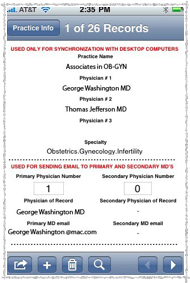
Now return to the “Practice info” page. The top half of the page is only used if the “On Caller” is utilized with the computer companion. The advantages of which are automated printed reports of all messages.
The Primary physician number should be “1” which should now allow you to see your name and e-mail in the correct boxes. If not. delete the number “1” and reinsert it as this is the first time that you are inserting data. Your information should appear. The same holds true for the secondary physician number if you are covering for another physician’s practice.
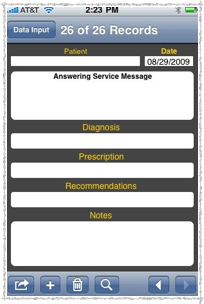
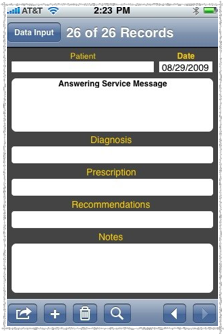
In order to use the application properly go the the “Patient Info” layout. Type in the patient’s name. This is helpful for future searches but is not absolutely necessary. (The text message from your answering service also contains the patient’s name.) Close this application by pressing the round circle at the bottom of your iPhone and go to your text message from your answering service (iphone main page-”messages”). Double tap and select “copy”.
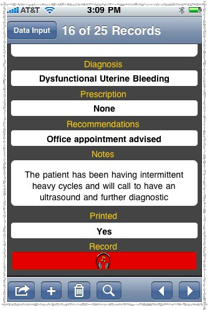
Reopen the “On Caller application and double tap in the field entitled “Answering Service Message” and select “paste”. Next go to the field entitled “diagnosis” and select one. If you do not see the diagnosis that you want pick something that is close. If not, you may double tap and type in a new diagnosis. ( If you do this the other fields will not be able to filled automatically).
Once you pick a diagnosis the “Recommendations” and “Notes” fields will be filled in automatically. If these results are not accurate, double tap on the desired field change it. You may now type in any different information or add to the preexisting text. You may also tap on the prescription field to modify any medications prescribed.
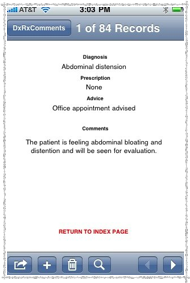
If you do not like the pre formatted text, go to the layout DxRxComments and change the desired information. Be aware that once you change any information on this page, you will be changing all future data, SO BE VERY CAREFUL.
If you are considering e-mailing reports, at the bottom of the “Data Input” layout there is a field entitled “Printed”. It defaults to “No”. If you want to see which patients have not yet been printed tap in this field after the “find” icon at the bottom of the screen has been depressed and select “No”. Click on Perform Find in the right upper corner and all patient’s records that have not been printed now appear. You may change this field to “Yes” after the message has been e-mailed to you. The computer companion automatically will print all encounters for you simultaneously and change the printed box to yes for all records completed.
The last field is “Record”. By selecting this field a dialogue box entitled “Play/Record Sound” opens. Select ONLY this field and depress the “Record” field and 30 seconds of speech may be recorded (if you prefer not to input any data at this time). Click “Done” when completed.
You will now see a headphone set in the red dialogue box at the bottom of the “Data input” page denoting a prerecorded message.
If you make recordings or and synchronize with your desk top computer, you will see a message the first time that you sync as where the “container” is. The computer is asking where to store pictures or voice recordings. The easiest is to create a folder on your desktop entitled “container”. Alternatively, you can have these files stored anywhere.
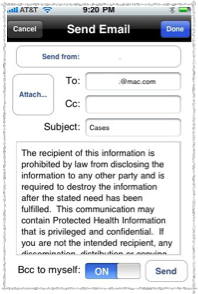
Now that you have input all of your data, go back to the “INDEX” layout and click on “e-mail”. The first time that you open this page, your iphone will ask for pertinent data relative to your e-mail account. Click on “Accounts” if not already selected. It will ask for your name, e-mail address, user name of your e-mail account and password. When these are filled out select “Test Settings” and make sure that the information that you have submitted is correct.
Once you have filled out the account info, in the future when you select e-mail from the INDEX LAYOUT an e-mail layout will open. Make sure that your e-mail info has been properly inserted as well as any covering physician that you have selected. Next select “Attach” to allow the PDF of the message to be attached. Select “Send” and your on call message will be sent to your computer where it may be printed. The e-mail program will ONLY work from the “Index” page.
Shortcuts to return to Index page from other layouts include pressing “the yellow “Patient” on the Data input menu and the “used only for synchronization” red menu bar on the “Practice Info” page. Similar shortcuts are available on other layouts.
Once the data has been inserted, the program will work seamlessly in the future. The desktop application for computer synchronization is offered free of charge. (See Downloads)